Get Backflow Protection With Fernco Flap Valves
Fernco Flap Valves provide passive backflow protection for stormwater outfalls and drainage systems. Flap valves create a one-way outlet that prevents liquid from travelling back through the drainage pipe. Some of the most common applications are for culverts, municipal infrastructure, community flood prevention, and pond inlets.
Fernco Flap Valves are extremely versatile and can be connected to a range of pipes, including:
- ABS
- Cast Iron
- Clay
- Concrete
- Corrugated Polyethylene
- Ductile Iron
- HDPE
- SCH. 40 PVC
- SDR-35 PVC
- Steel
- Western Clay


The Manufacturing Quality and Benefits of Fernco Flap Valves
Exceeds the leakage rate and manufacturing requirements of BS 7775 and Class 5 of DIN 19569-4
• Superior impact and weather resistance, engineered for long-term outdoor exposure, debris strikes, and ice-loading conditions in cold climates.
• Enhanced abrasion and stress crack resistance supports long-term durability in cyclic loading and sediment-laden flows.
• Won’t rust, pit, or seize, ideal for corrosive outfall environments and submerged, tidal, and maritime installations.
• Broad chemical resistance to compounds commonly found in stormwater, wastewater, and combined sewer overflow (CSO) environments. With UV-stable material that helps resist sun-related degradation.
• Lightweight when compared to cast iron or stainless designs. supporting safer handling, easier installation, and reduced installed cost, while low scrap value helps reduce theft risk at accessible sites.
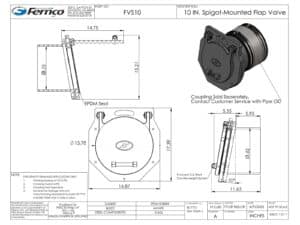
You can view the full Fernco Flap Valve spec sheet here.
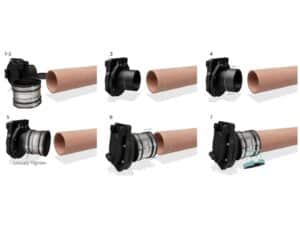
Fernco Flap Valve Installation Steps:
1. Ensure the pipe has a straight, square end.
2. Clean the outside surface of the pipe so it’s smooth and free of dirt, scale, or debris—this helps the coupling seal properly.
3. Measure the coupling width and mark half of that measurement on both the Flap Valve spigot and the connecting pipe.
4. If using a bushing, slide the bushing onto the Flap Valve spigot until the edge of the bushing is flush with the marked line.
5. Slide the Fernco coupling over the bushing until the end faces are flush, then hand-tighten the end clamp. If no bushing is required, slide the coupling onto the spigot until the edge of the coupling is flush with the marked line, then hand-tighten the end clamp.
6. Butt the Flap Valve spigot up to the main pipe. The coupling should now align with the line previously marked on the pipe. Confirm the Flap Valve is oriented correctly (hinge mechanism at the 12 o’clock position), then hand-tighten the remaining end clamp.
7. Tighten all clamp bands to the recommended torque (see coupling label), tightening in sequence across the width of the coupling and starting with the center shear band.
Selecting which valve is best for your project will depend on your connection options, pipe type, and coupling requirements. Connect with our plumbing lead George by phone or email for customized recommendations for your job.